Other cameras with interchangeable lens and external flash could also serve as a basis for the prototype. Our Sony camera has an APS-C sensor with 1.5 crop factor.
We found the Camremote trigger to work well for our prototype. A camera with a more powerful API would make camera control even easier. For example, we currently canyot stream pictures from the camera to the PC, but have to transfer them via micro-SD card. Also, we are limited in our ability to read/set the camera configuration programmatically.
The Sony a6000 camera mirrors its viewfinder on a micro-HDMI port. We connect the micro-HDMI port to the PC via a HDMI-to-USB3 capture card. The capture card is listed as a webcam (DirectShow Device) and we capture it using Windows Media Foundation.
The Intel sensors have a very small form factor, and can be connected to our development laptop via a USB 3 hub. The depth accuracy of the sensor is about on the level of the first Kinect sensor.
At the time of our development, the Intel RealSense SDK did not support more than one sensor connected to a PC. However, the R200 camera is also listed as a regular DirectShow Device. Thus, we grab the four depth streams using the Windows Media Foundation SDK, rather than the RealSense SDK.
Shown below is a schematic of our sensor mount for the R200 sensor (measurements in inches).

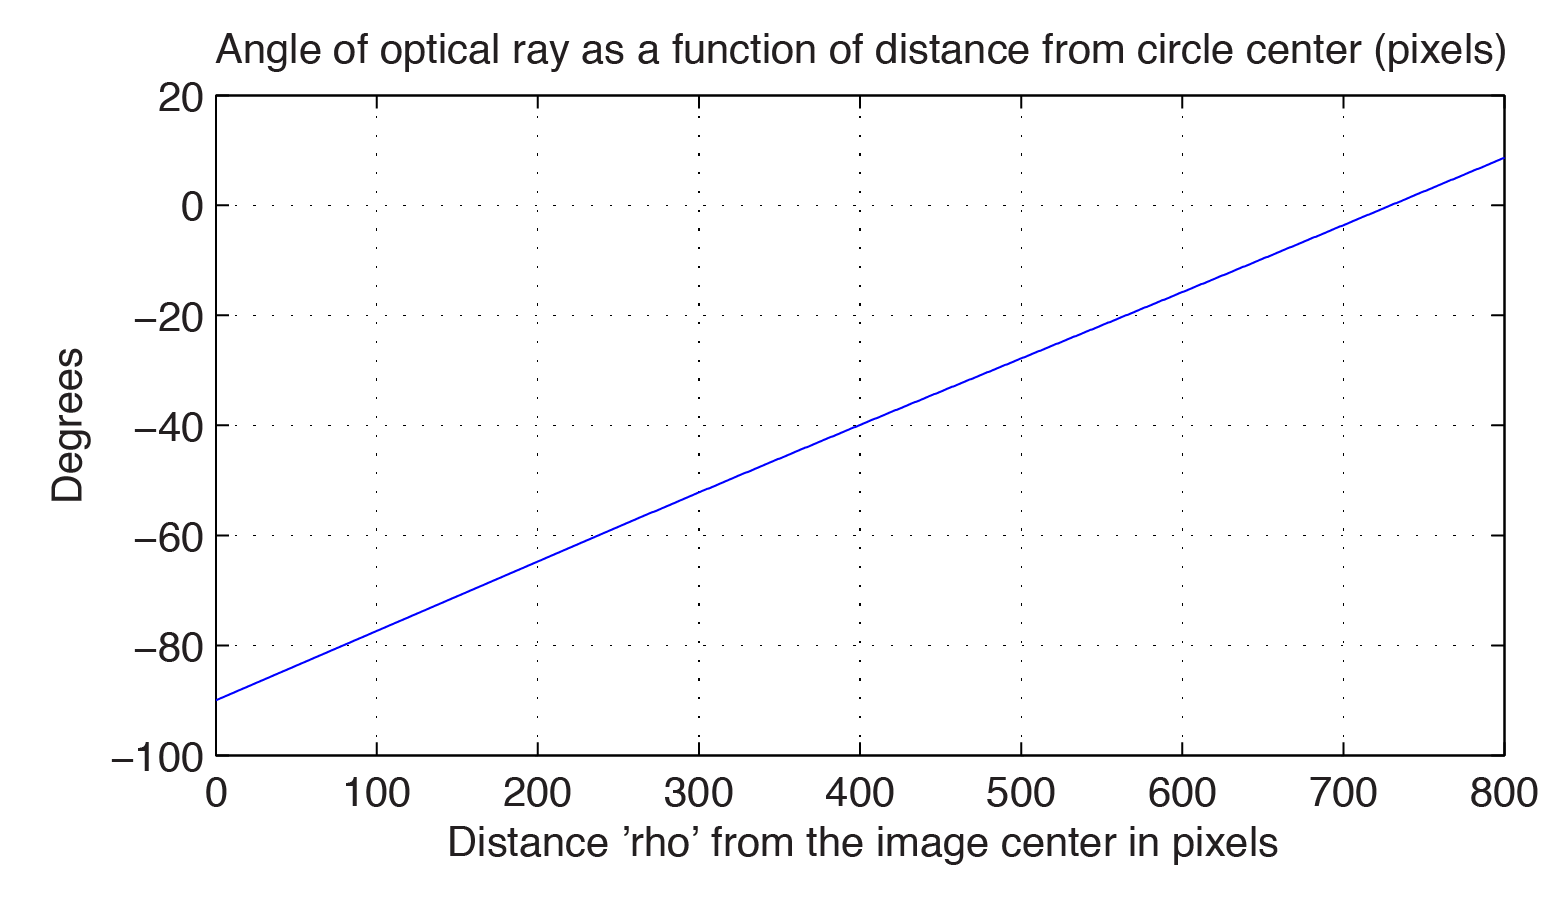
Our combination of rectangular camera sensor and fisheye lens crops the fisheye image at the top and botton. We fill in the missing rows by mirroring.
The fisheye maps incident angle linearly onto the distance from the image center, which we verified by calibration.
The entire flash, including batteries and capacitors, is too heavy and big to be actuated on the pan/tilt system we use. Thus, we disassemble the flash to seperate the relatively light-weight head from the body. Before opening the flash, one should remove the batteries and let the capacitor inside the flash lose its charge. Even after a day without batteries, the capacitor can carry significant charge, so wearing shoes and testing of open connections with a multimeter is advised.
There are a number of wires connecting base to body. We cut the wires and solder in about 20cm of extension.
The servo motors are controlled via pulse width modulation, where the pulses are generated using the timing hardware of the the AVR 328P microcontroller. We connect the PC to the AVR over USB. The USB-to-UART circuitry is provided by the Arduino board.
The pan/tilt system is modified slightly. We use a customized base plate that moves one of the rotation axes closer to the front of the camera.

In another modification, we mount the servo motor outside the pan/tilt bracket, so that the flash head can be mounted inside. This puts the flash head's center of mass close to the rotation axis.
We use the Walimex cage without modification. On the left, we attach a 90-degree bracket, on which we mount the fisheye camera. On the right of the cage, we mount the Actobotics channel. Underneath the channel, we mount the battery packs for the servo motor, and the flash body. Inside the channel, we mount the pan/tilt system and the four depth sensors.